
Before you can set up SSO integration with Okta you’ll need to create a company admin account in officeAdmin and have access to that account via a regular web browser. Please contact us if you need support in creating a company account.
Next, you’ll need administrative access to your Okta account.
Step 1: Set identifier
Login to officeAdmin and select ‘Company’ in the main menu. Open the tab integrations on top of the page. Select ‘Single Sign On’.
- Select ‘Okta’ as a provider (note this will be changed to a generic label).
- Enter an SSO id that resembles your company name.
- Save the integration, you will enter additional data later.
Step 2: Configure Okta
- Login to Okta administrative portal
- Select ‘Applications’ in the main menu and select the ‘Add Application’ button
- Select ‘Create new app’

Make sure you select ‘Web’ as a platform and ‘SAML 2.0’ as the Sign on method.

- Enter a name for the app, i.e. Officebooking
- Add the Officebooking logo
- Select Next
In the SAML Settings form you need to enter the Single sign on URL and Audience URI (SP Entity ID)
An example URL would be:
Single Sign On URL:
https://login.officebooking.net/sso/access/[your configured ssoID from step 1]/consume
Audience URI (SP Entity ID):
https://login.officebooking.net/sso/access/[your configured ssoID from step 1]/metadata
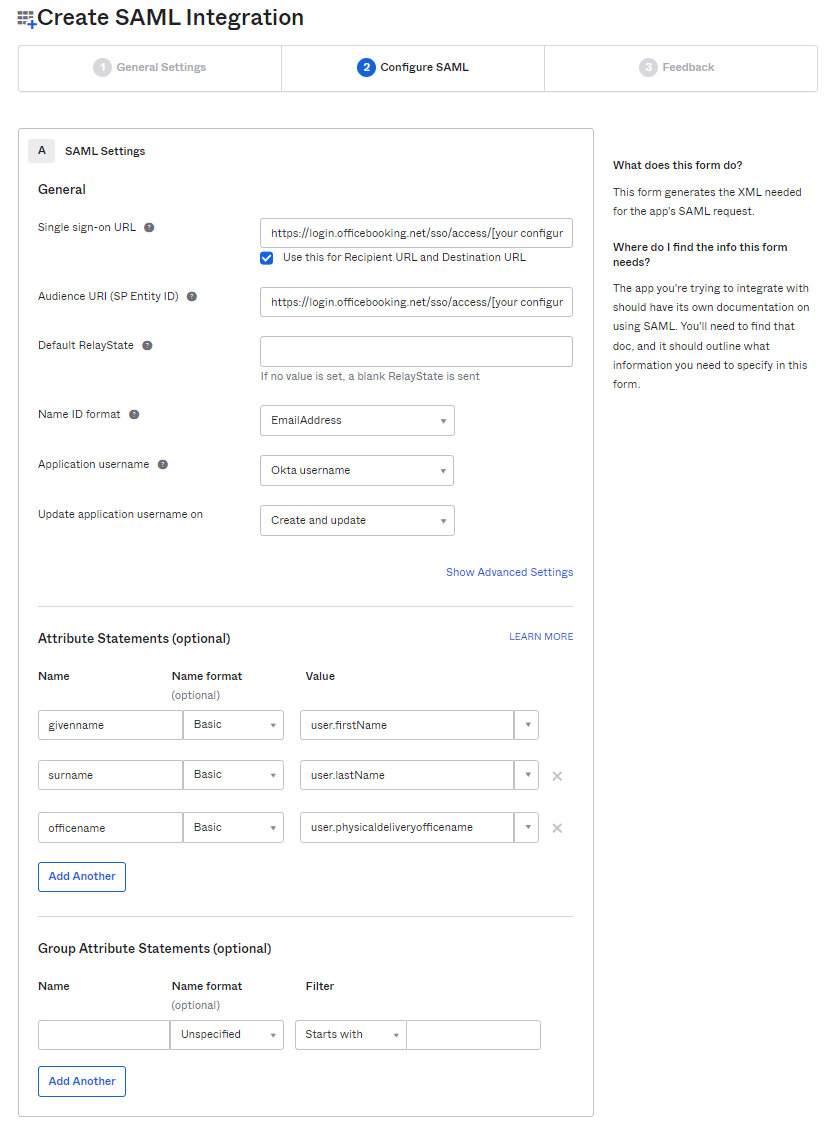
- As Name ID format choose EmailAddress
- As Application username choose Okta username
- Next set the Attributes
The following attributes are supported:
Givenname (first name)
Surname (last name)
Optionally you can add the following attribute:
officeName – user.physicaldeliveryofficename
For default office location. Please make sure you add a reference id to the location in Officebooking.
Step 3: Set up SSO in officeAdmin
In okta select the Sign On tab at the Officebooking application overview

- Select ‘View Setup Instructions’ button
- Open Officebooking administrator portal and select Integrations at the Company page.
- Select ‘Single Sign On’ integration and choose ‘Okta’ (This will be changed to ‘Saml SSO’!)
- Enter the SSO metadata URL, IdP Entity Id, and Certificate in the Officebooking form.
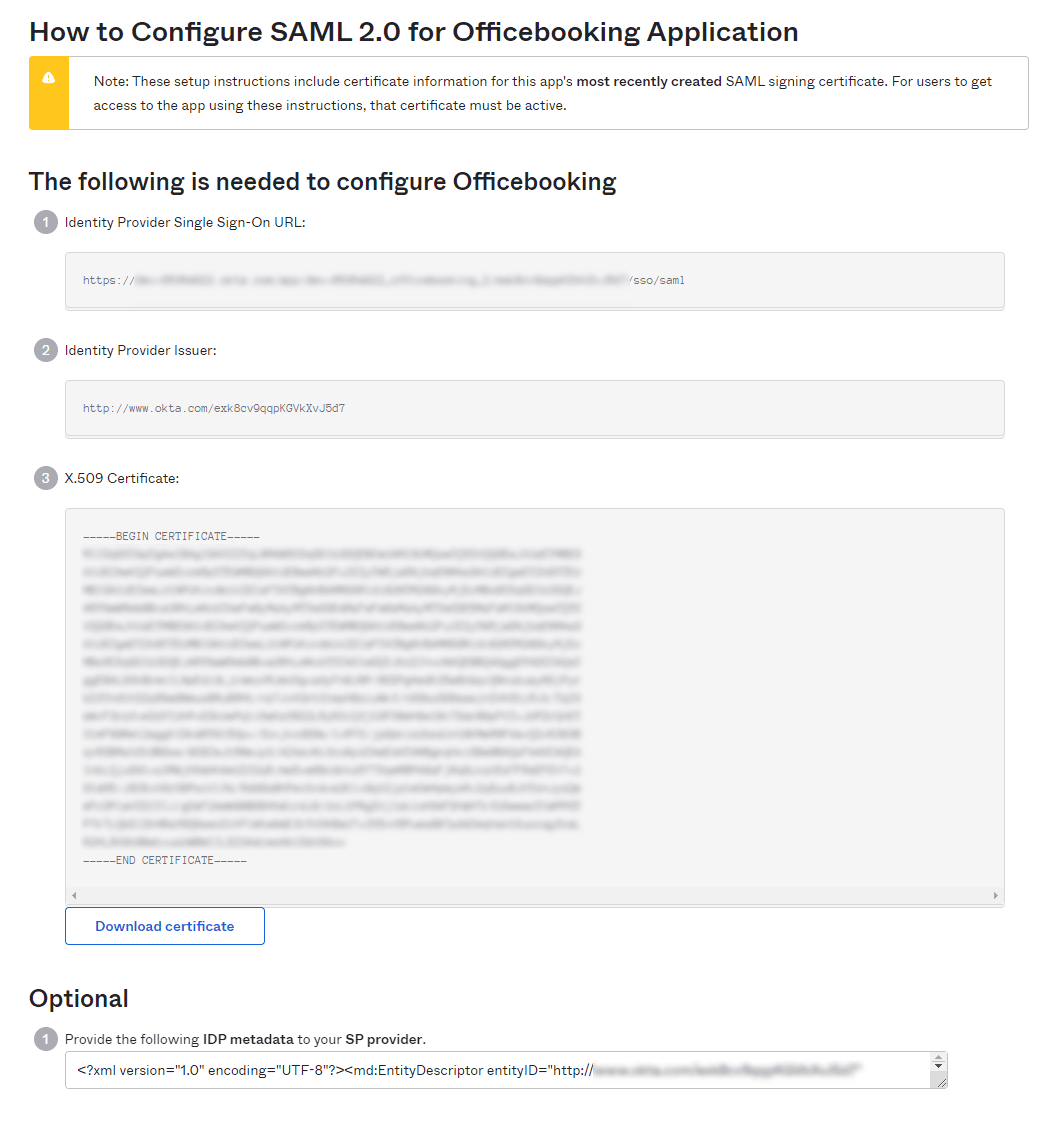
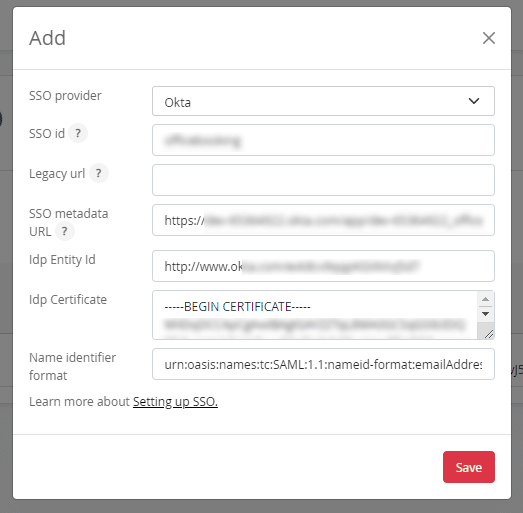
SSO metadata URL = Identity Provider Single Sign-On URL (1)
Idp Entity id = Identity Provider Issuer
Idp Certificate X.509 Certificate
- Add the following to the last box:
- Name identifier format: urn:oasis:names:tc:SAML:1.1:nameid-format:emailAddress
- Select Save
Step 4: Add users to Okta
Return to the Okta Administrator portal and create or select users to access the Officebooking app. If the user isn’t present in the Officebooking app the user is newly created to Officebooking when logging in the first time with Okta.
Assign the Officebooking app to the selected user(s). For full deploy you may choose to add a group of users, dependent on the configuration of your directory in Okta.
To assign users to the app select the ‘Applications’ menu item in the main menu of Okta. Select the button ‘Assign Users to App’.
- Tick the select box at the Officebooking app and select your users.
- Select Next.
- Select ‘Confirm Assignments’ to confirm.
Step 5: Check domain names
It’s possible to verify users from multiple domain names within Officebooking. Return to the administrative portal of Officebooking and select ‘Company’ from the main menu.
Within the tab ‘General’ you can add multiple domains, separated by a |
i.e: Wilderman.nl|wilderman.com|wildermankruijt.eu
Step 6: Test the app
- Open a new browser window and enter app.officebooking.net
- Select ‘Login with SSO’ on the login page.
The Okta login window should appear.
Login using your email address and password. If Multifactor authentication is enabled this will be requested by the Okta app. When the user has successfully logged in the user is redirected to the Officebooking app and logged in.