
Officebooking supports Single Sign On (SSO) logins through SAML 2.0 when you’re on the Business Plus, Enterprise edition or subscribed to SSO in combination with any other subscription. We support both SAML 2.0 via self hosted Azure AD.
If you’re not familiar with Active Directory and SSO concepts, please start here.
Step 1: Access to OfficeAdmin and AD environment
This guide assumes someone in your organization (or Officebooking Support) has already created an Admin account for you. This account will give you access to the OfficeAdmin portal.
Next, you’ll need administrative access to your company Azure AD environment. Once you’ve gained access to both environments you can start implementing the integration.
Step 2: Set identifier in the OfficeAdmin
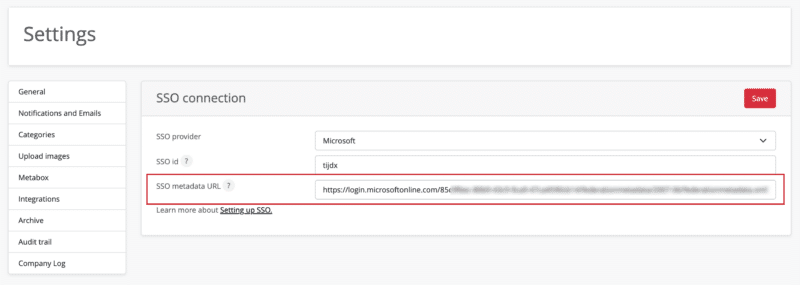
- Login to the OfficeAdmin portal and go to the ‘Settings’ page in your menu. Open the tab ‘Integrations’ on the top of the page.
- Here you choose the ‘Single Sign On’ option.
- First select ‘Microsoft’.
- Enter an SSO id that resembles your company name.
- The SSO id is included in the SSO metadata URL which will be created later in the process.

Step 3: Configure Azure AD
- Login to Microsoft Azure Active Directory admin center.
- Select the button ‘Enterprise applications’ in the left hand menu.
- Select ‘New application’, then select ‘Create your own application’ and enter a name for the application, i.e. ‘Officebooking’.
- Start with assigning users and groups. Select which users should get access to the Officebooking app.
- After assigning users and groups, go back and select the button ‘Set up single sign on’.
- Then select the option ‘SAML’.
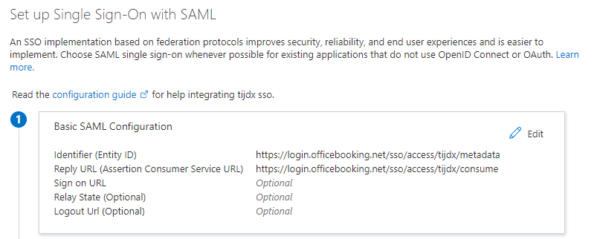
- Here you have to add the Identifier and Reply URL for the Officebooking app.
For Identifier (Entity ID) you need to enter the following url. Change the ssoID in the url to the id you’ve entered in the OfficeAdmin portal in step 2.
https://login.officebooking.net/sso/access/[your configured ssoID from step 2]/metadata
For Reply URL (Assertion consumer Service URL) enter the following url.
Again change the ssoID to your own id.
https://login.officebooking.net/sso/access/[your configured ssoID from step 2]/consume
Step 4: Enter user attributes
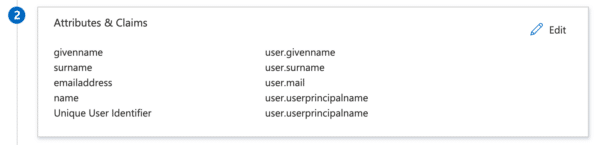
Next, enter the attributes. We will need at least the following attributes:
- givenname (first name) – user.givenname
- surname – user.surname
- emailaddress – user.mail
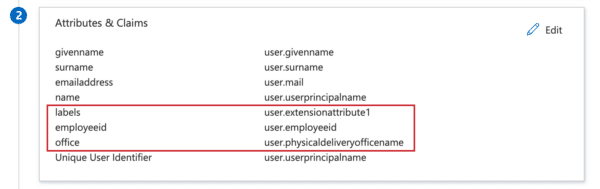
Next to the mandatory attributes, it’s possible to add the following optional attributes:
- labels – user.extensionattribute1 – This will send through any labels added to the user in AD, for example the label ‘firefighter’. This user label will be visible in all apps, at Who’s at Work.
- employeeid – user.employeeid – This will send through the user id from AD. This user id will be only visible for an Admin in the OfficeAdmin and can be used for HR purposes.
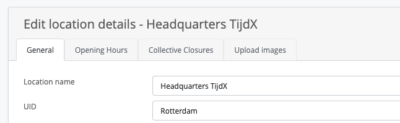
- office – user.physicaldeliveryofficename – This sets the default location for the user. Note: you’ll need to match the location ID with the Location UID in OfficeAdmin! The Location UID can be entered in the OfficeAdmin via Location > Select location > Edit > Enter UID > Save location.
Note: in the case you’ve added these attributes, these extra attributes need to be activated in Officebooking. Please contact Officebooking Support, and they will help you activate this.
Step 5: Enter metadata URL in the OfficeAdmin
After following the steps above, you’ve collected the right metadata URL to enter in the OfficeAdmin portal (add to the field you’ve left open in step 2). The metadata URL will be something like:
https://login.YOURCOMPANYURL.com/federationmetadata/2007-06/federationmetadata.xml
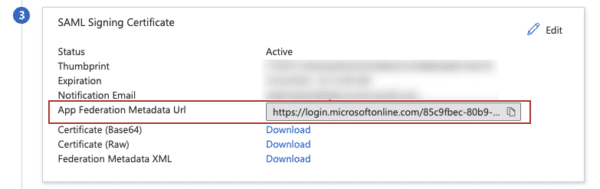
Copy the ‘App Federation Metadata URL’ and enter it in the OfficeAdmin portal at ‘SSO Metadata URL’.
Step 6: Start testing
- Make sure you add yourself or some test users to the Azure AD group entitled to use the Officebooking app. To add users manually or by powershell you can use these instructions of Microsoft.
- Testing SSO is done either directly from Azure Admin center, the mobile app or the web app.
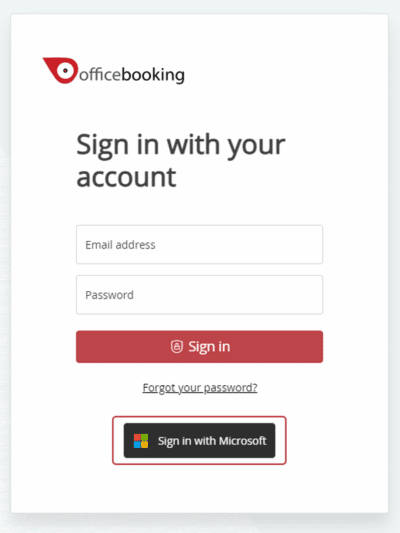
- When testing via the Officebooking mobile app or web app, you log in by selecting the button ‘Login with SSO’. You’ll need to enter the three letter Company code that you/is created for your company. You can find this in the OfficeAdmin on the Settings page (Settings > General > Tag prefix). The company code could for example be TIX for TijdX.
- You’ll be redirected to your Office365 login page. Enter a valid username and password. You’ll be validated by O365 and successfully logged in at Officebooking via SSO.
Once a user logs in via SSO, the Officebooking system will automatically save the user and its account settings. This user account can now also be edited by an Admin via the OfficeAdmin. Depending on the attributes you’ve added, every time a user logs in again, the system will check if there are any updated attributes and sync these with the Officebooking system.
Do you need support?
Please let us know if you need any support during the process of setting up you SSO connection. We are happy to set up an online meeting to walk through the steps together.