The Officebooking platform facilitates seamless sharing of your company’s resources for user or employee bookings. It offers various user interaction points such as web, mobile, and interactive signage solutions, ensuring comprehensive support for your users at every stage of their experience.
This step-by-step guide is designed to assist you in integrating your Officebooking platform with Microsoft Office 365 using Graph synchronization.
Please note: Azure Active Directory is now Microsoft Entra ID. All references in this manual to Active Directory are to be interpreted to ‘Entra ID’.
Synchronization information
After successful completion of the integration, only new reservations generated after activating the integration will be synced. Reservations, including recurring reservations that were created prior on a resource calendar are not synchronised. Should you wish to synchronize existing reservations made in the past, kindly reach out to Officebooking Support for assistance with importing old reservations.
New reservations, either created through Outlook Calendar, Outlook Add In or created within the Officebooking Platform with any app are synchronised immediately with Office 365. For recurring reservations we create the first instance of your series, all subsequent events are created during the night.
Integration Step by Step
Step 1: Access to OfficeAdmin and Microsoft Entra ID (Azure Active Directory)
This guide assumes someone in your organization (or Officebooking Support) has already created an Admin account for you. This account will give you access to the OfficeAdmin portal.
Next, you’ll need administrative access to your company Entra ID (Azure AD) environment. Once you’ve gained access to both environments you can start implementing the integration.
Step 2: Register Officebooking as an app in Entra ID
Follow the instructions below.
- Sign in to the Azure portal: https://portal.azure.com/
- In the left-hand navigation pane, select the Microsoft Entra ID service.
- Then select App registrations > New registration.
- Give the registration a meaningful name, for example ‘Officebooking App’.
- Choose ‘Accounts in this organizational directory only’ as the account type.
- Next, the Redirect URI type in the dropdown should be ‘Web’.
- Enter https://[tenant].officebooking.net/api/microsoft_graph/notifications/notification_url as ‘Redirect URI’.
- Select ‘Register’.
The tenant name is dependent on your subscriptions and contract. Please check with Officebooking Support for information on your tenant name or ID.
For general information on registering applications within the Microsoft identity platform please check this link:
https://docs.microsoft.com/en-us/graph/auth-register-app-v2

Step 3: Saving the required API values
After registering the app, you will be redirected to a new page where you can find the following values. Save the Application (client) ID and the Directory (tenant) ID. We need these values later.

Step 4: Creating a client secret
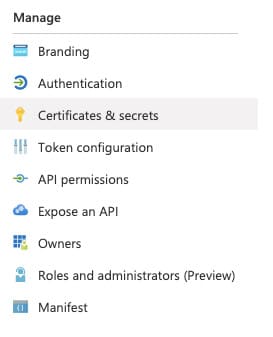
- Select ‘Certificates & secrets’ in the ‘Manage’ submenu.
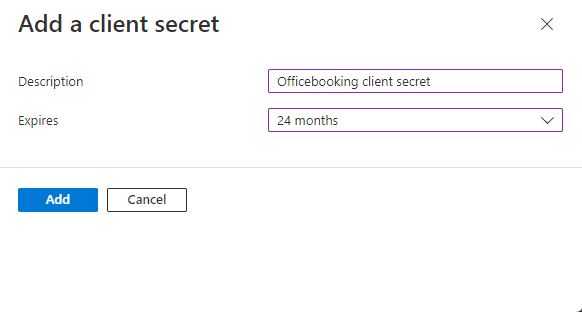
- Select the ‘New client secret’.
- Enter a value in ‘Description’.
- Next, select one of the options for ‘Expires’.
- Then select ‘Add’.


6. After selecting ‘Add’ you will be redirected to a new page, here you can find the client secret ‘Value’.
7. Store the value in your favourite password manager, it will be hidden afterwards. You will need it later when connecting Officebooking in the OfficeAdmin.

Step 5: Configure Permissions
- Select ‘API permissions’ in the left menu.
- Select ‘Add a permission’.
- Select ‘Microsoft Graph’ as API.
- Then select ‘Application permissions’, not ‘Delegated permissions’.
Next you have 2 different options for the Officebooking app: you can choose to sync only users (in situations where you don’t want to pull the meeting room calendars) or sync both users and calendars (meeting rooms). Officebooking always needs user permissions to successfully synchronise calendars. Other than that the user sync will make sure that once a user no longer works for your company, its account will automatically be deactivated in Officebooking. The user will no longer have access to Officebooking.
To sync only users:
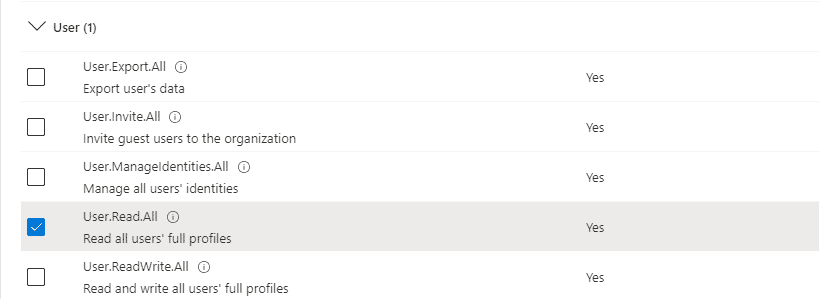
- Open the ‘User’ tab.
- Select ‘User.Read.All’.
- Select ‘Add permissions’.

To sync both users and calendars:
- Open the ‘User’ tab.
- Select ‘User.Read.All’.
- Then, open the ‘Calendars’ tab.
- Select ‘Calendars.ReadWrite’
- Select ‘Add permissions’.


Next, you have to grant Admin permission to add the permissions to the App.
- Select the button ‘Grant admin consent for [your company name]’
- Follow the steps to successfully grand admin consent for your company.
- The status for all permissions should say ‘Granted for [your company name].

Step 6: Add the API access token to the OfficeAdmin portal
To activate the synchronization, you have to add the token to the OfficeAdmin portal.
- Login to the OfficeAdmin portal and go to the ‘Settings’ page in your menu. Then select ‘Integrations’ in the second menu.
- Here you choose the ‘Office365’ option.
- Then enter the different data, that you saved earlier, as follows:
Domain: enter your Office365 company domain. For example: tijdx.nl (without www.).
Tenant id: Directory (Tenant) ID
Client id: Application (Client) ID
Client key: the Client secret Value, not the secret ID

4. Select ‘+’ to add the new integration. The integration is saved right away.
In case you’re only syncing users with Graph, this is your last step in this implementation process and you can skip the next steps.
Step 7: Connect an asset in Officebooking with the corresponding meeting room
In case you’re only syncing users with Graph, you can skip the next steps.
- Go to ‘Assets’ page in the left menu of the OfficeAdmin.
- Search for the meeting room you want to connect. It can help to filter on the right category, for example ‘Meeting room’.
- Select the name of the asset and select ‘Edit’.
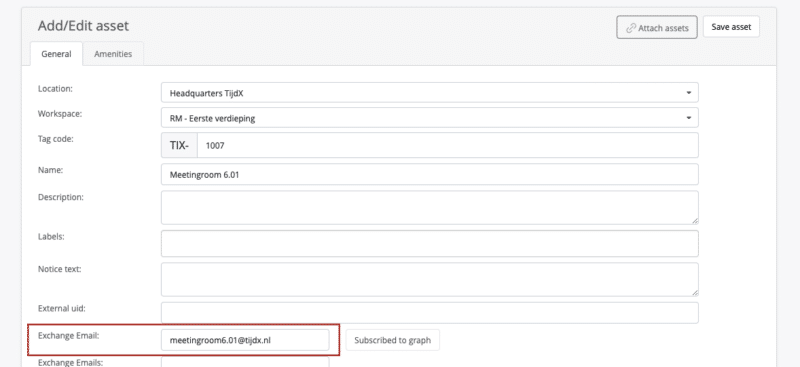
- Enter the Exchange email address.
- Select ‘Save asset’, to save the email address.
- Now select ‘Edit’ again and select the ‘Subscribe’ button next to the Exchange email address you’ve just entered. Once the email address is entered correctly, the button will show ‘Subscribed to graph’.
- Again select ‘Save asset’ to finish connecting the asset.

Step 8: Optionally add titles to the meetings in Outlook calendar for synchronisation
By default, Exchange shows the name of the organizer as title of the meeting in the Resource calendar. If you want to display the original title of the meeting room in both the Resource calendar and Officebooking you can enable this setting via PowerShell.
Step 9: Start testing
It’s important to check if the user you’re testing with, both exists in your Exchange environment and the Officebooking app for the synchronization to work properly. So please make sure that the user exists in both environments and has the same email address.
Single reservation from Outlook > Officebooking
- You may test the integration by creating a meeting in Outlook calendar and invite the room as an attendant.
- Check the confirmation from Outlook. If the room has been successfully added, it will take about 1 minute before the meeting appears in the Officebooking app.
- Now open the OfficeAdmin to check if the reservation has appeared.
- Select ‘Reservations’
- select the tab ‘List’at the top of the page.
- Select the date you’ve created your test reservation and check if the data is correct.
Single reservation from Officebooking > Outlook
The same test can be executed the opposite way.
- Log in to the Officebooking app. In our example we use the web app (login.officebooking.net).
- Search for the asset that you want to make a test reservation for.
- Create the reservation in the app. You can see that the reservation is added to your personal reservations list on the ‘My Reservations’
- Now login to the calendar on Exchange as THE SAME USER.
- Check to see if the reservation for the meeting room (that you just made in the app) was added. Remember that there is a synchronization time interval.
