

Officebooking supports Single Sign-On (SSO) via SAML 2.0 for Business Plus, Enterprise, or customers with an SSO add-on subscription. SSO enables your users to log in securely using their managed Google account credentials.
This guide walks you through integrating Google SSO with Officebooking step by step.
Prerequisites
✔️ Admin access to the OfficeAdmin portal.
✔️ Super Admin access to your Google Admin Console (must not be a @gmail.com account).
✔️ Your Officebooking Admin account already created (by your team or Officebooking Support).
Step 1: Access OfficeAdmin and Google Admin
Make sure you can log in to both:
- OfficeAdmin portal: to configure SSO settings.
- Google Admin Console: to create a custom SAML app.
Once you have access, continue to Step 2.
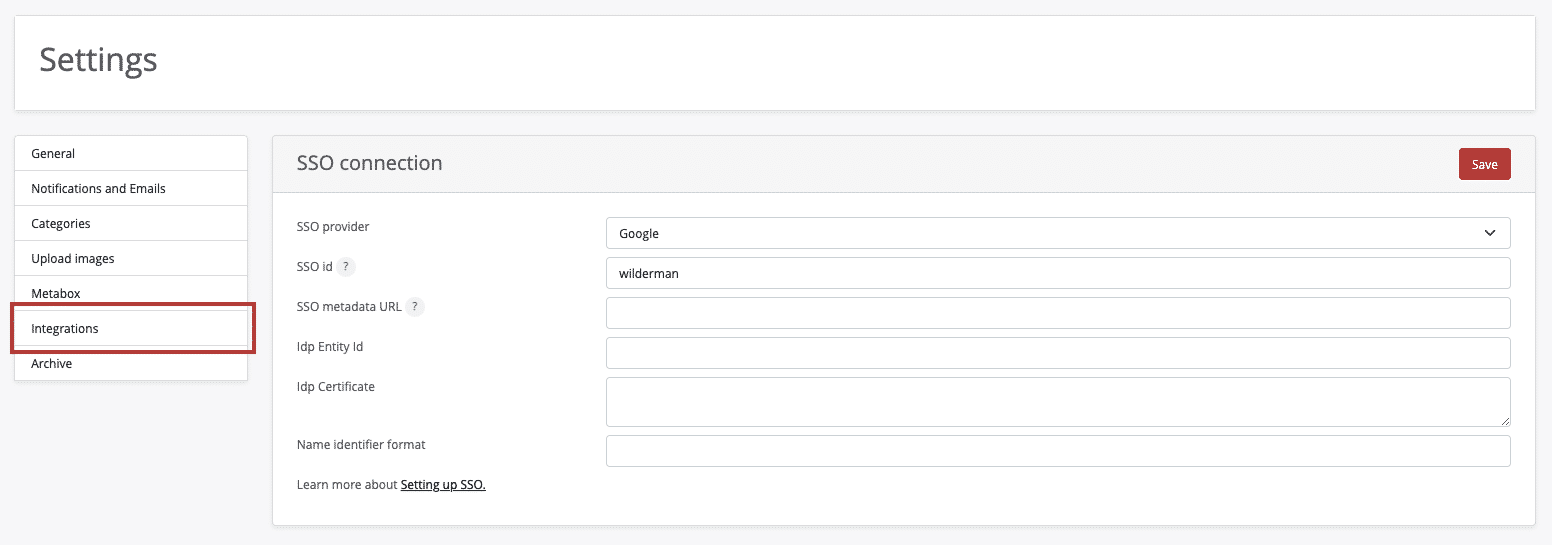
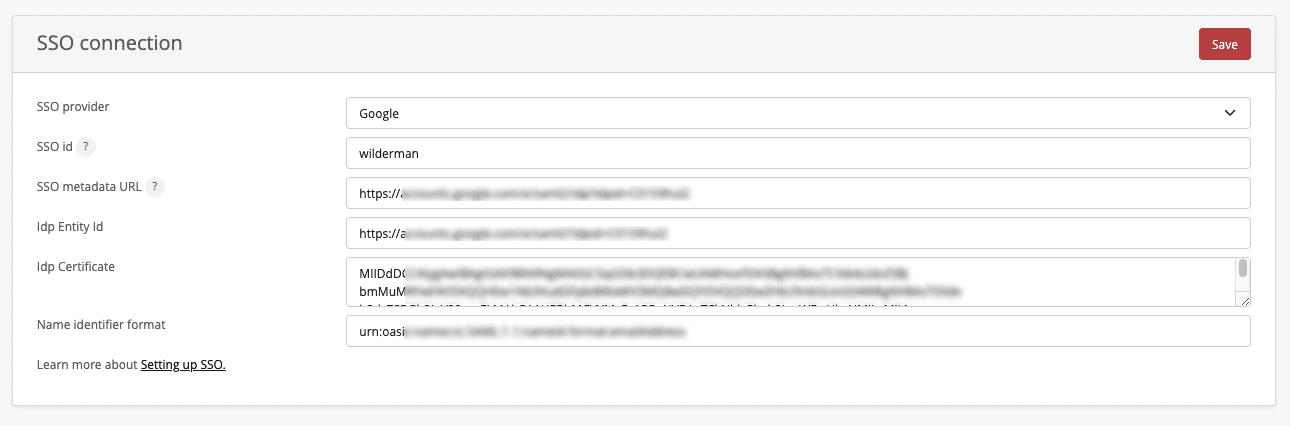
Step 2: Configure SSO in OfficeAdmin
-
Log in to OfficeAdmin.
-
Go to Settings > Integrations.
-
Select Single Sign-On and choose Google.
-
Enter an SSO ID that resembles your company name (e.g.,
wilderman). This will form part of your SSO metadata URL later. -
Leave this tab open—you’ll return here in Step 6.
Step 3: Set Up a Custom SAML App in Google Admin
-
Log in to the Google Admin Console with super admin credentials.
-
Navigate to Apps > Web and mobile apps.
-
Click Add App > Add custom SAML app.
-
Name the app (e.g., “Officebooking SSO”) and optionally upload an icon. Click Continue.
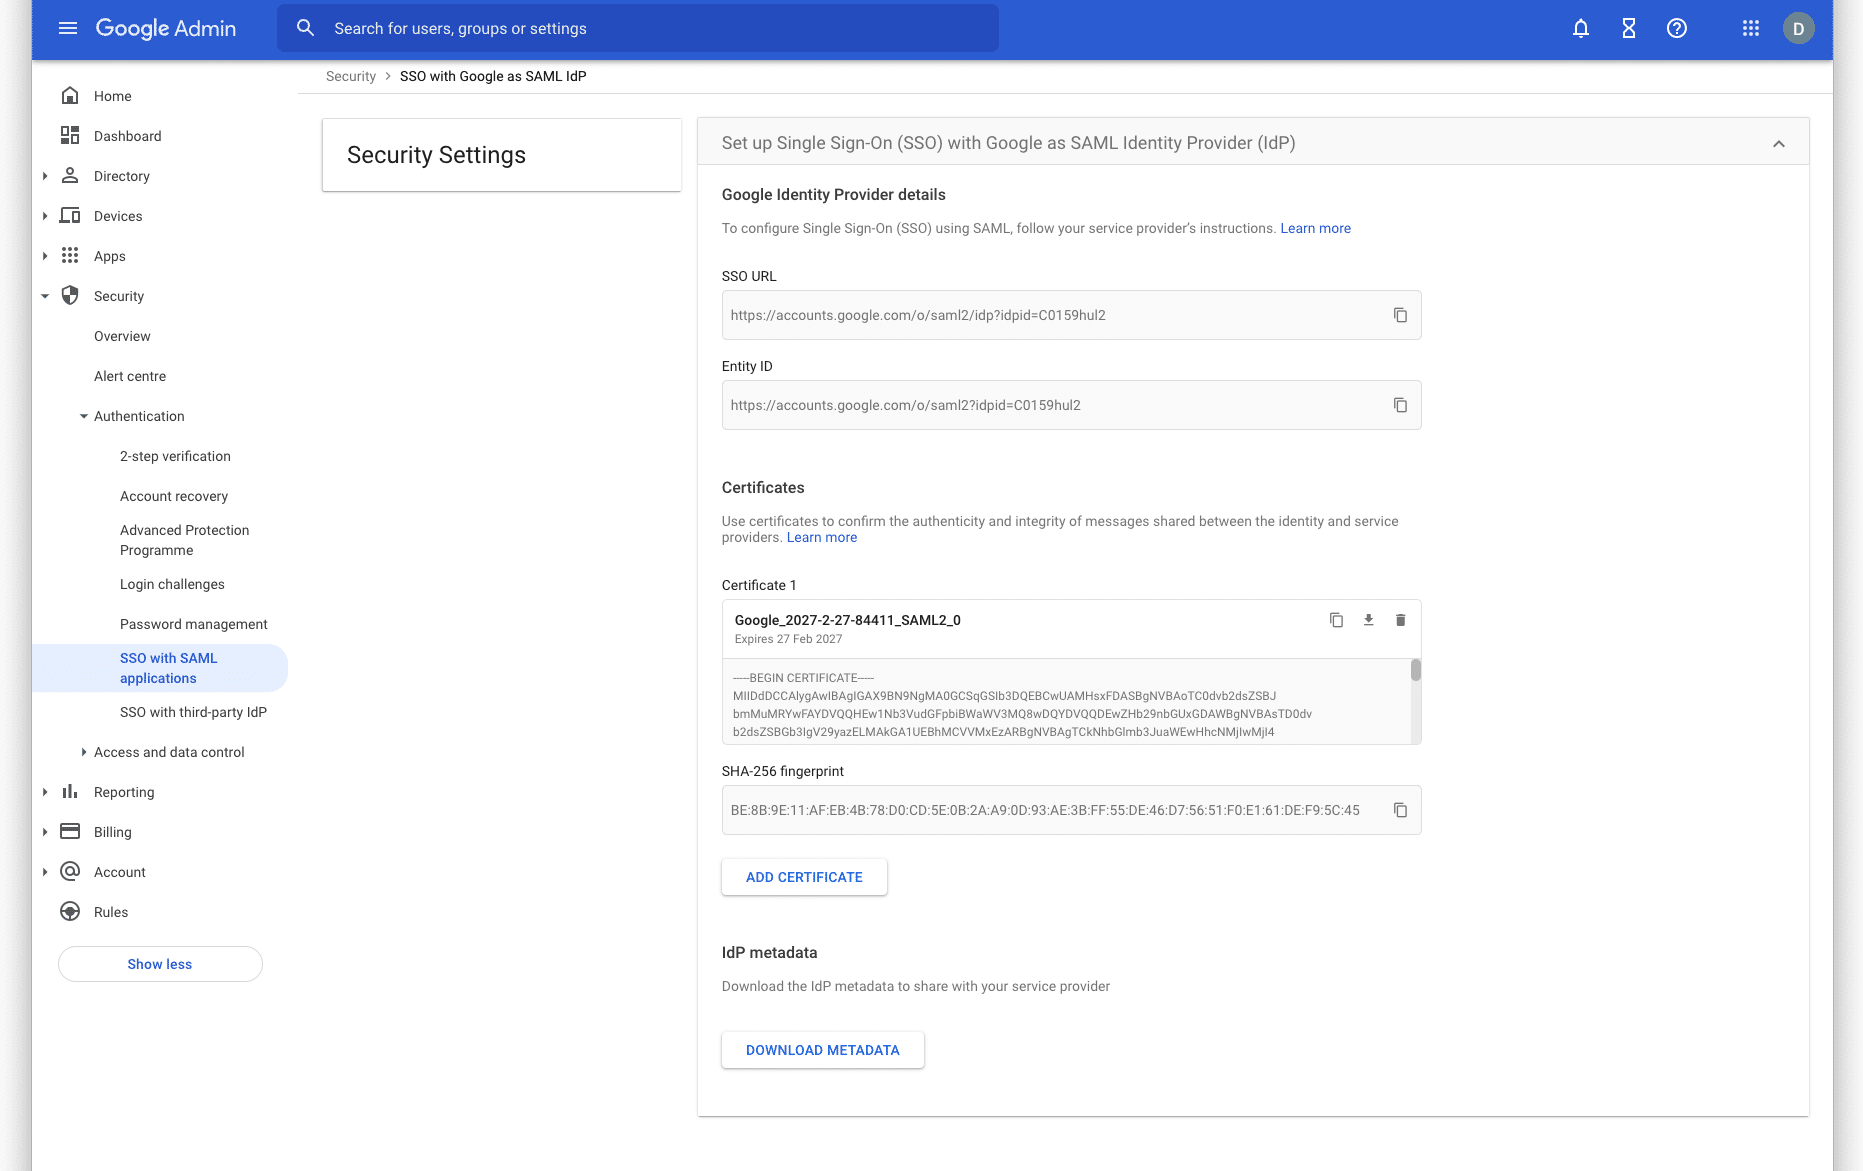
Google Identity Provider (IdP) Details
On the next screen:
Save the SSO URL and Entity ID.
Download the Certificate and metadata.xml file. (You’ll need these in Step 6.)
Click Continue.
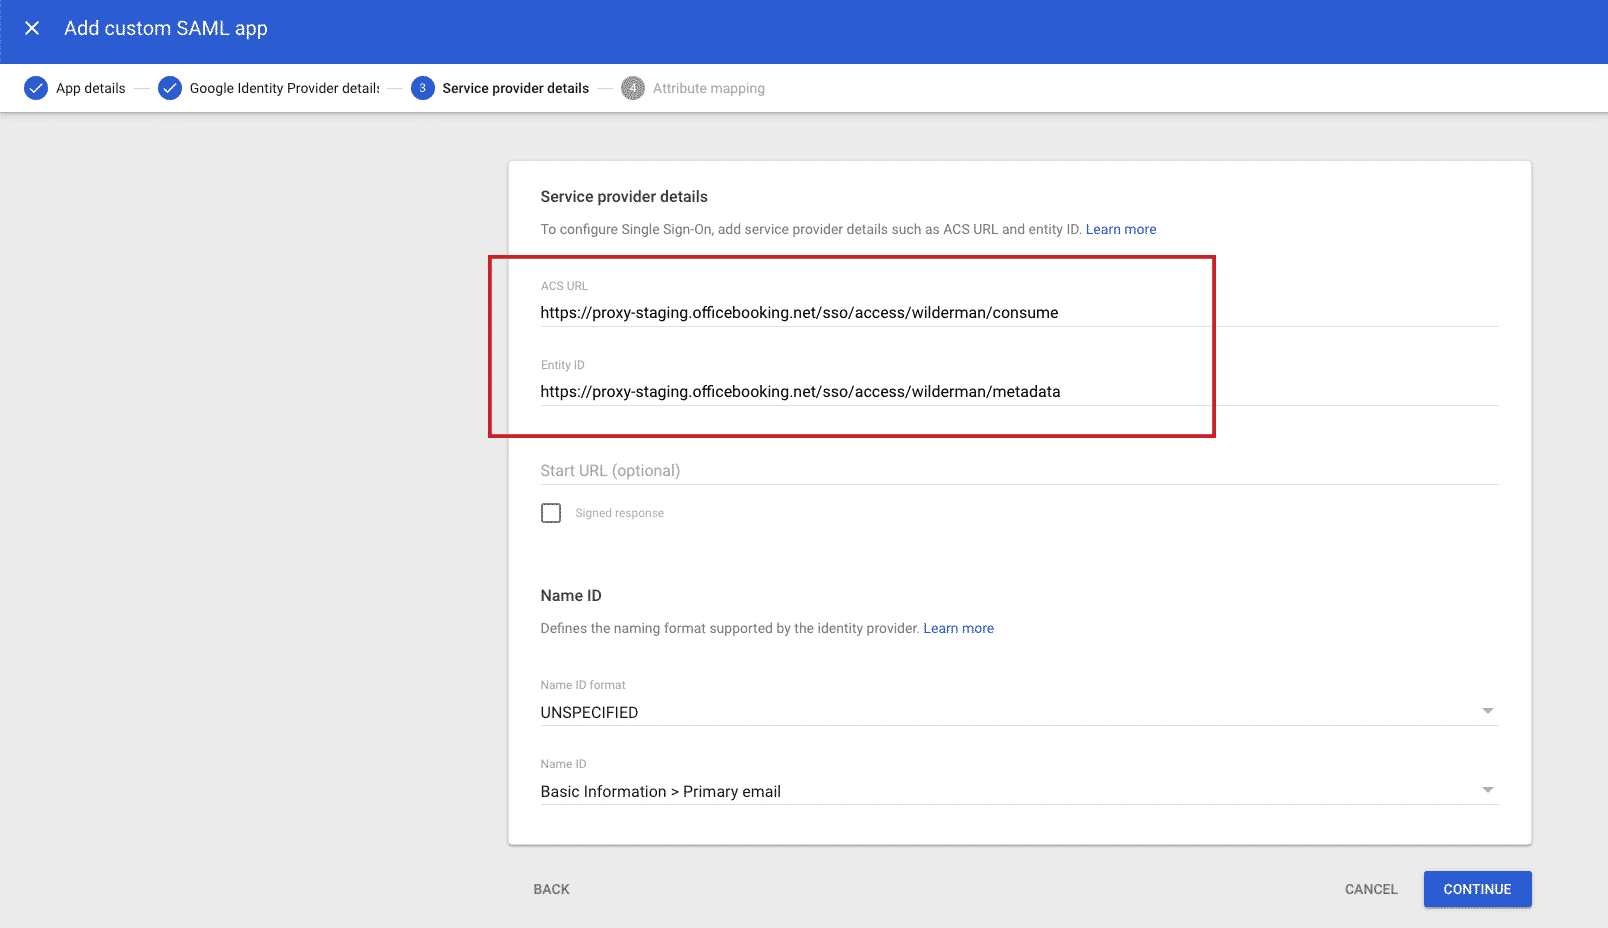
Service Provider Details
Enter the following:
-
ACS URL
-
Entity ID
Replace [your SSO ID] with the ID you created in Step 2.
Set Name ID format to EMAIL and map it to Primary Email. Click Continue.
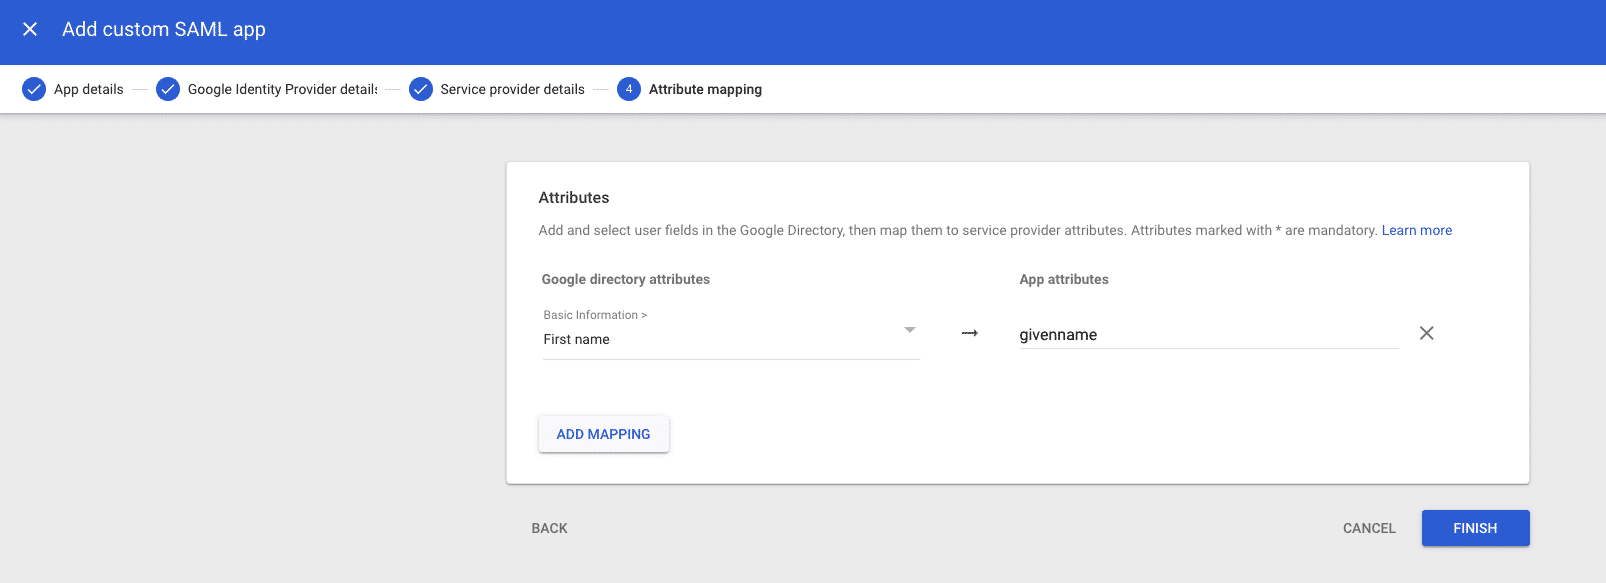
Step 4: Attribute Mapping
To ensure Officebooking receives user details:
-
Click Add Mapping and configure:
-
First name→givenname -
Last name→surname -
Primary email→Name ID
-
-
Click Finish.
Step 5: Turn on your SAML app and enable user access
- Go back to the Admin console Home page.
- Go to ‘Apps’ > ‘Web and mobile apps’.
- Select your previously created Officebooking SAML app.
- Select ‘User access’.
To turn on or off a service for everyone in your organization, select ‘On for everyone’ or ‘Off for everyone’, and then select ‘Save’.
Ensure that the email addresses your users use to sign in to the SAML app match the email addresses they use to sign in to your Google domain. Changes typically take effect in minutes, but can take up to 24 hours. For details, go to How changes propagate to Google services.
Step 6: Enter metadata URL in the OfficeAdmin
- Go back to your previously opened browser tab of the OfficeAdmin. You should still be in the ‘Integration’ tab, where you left off in step 2.
- Open the metadata.xml document you downloaded in step 3.
- Enter the metadata information to the OfficeAdmin like instructed below.
- Then select ‘Save’SSO id: enter your previously chosen sso id (step 2). This should resemble your company name. SSO metadata url: enter the url you’ve saved in step 2. You can also get this from the metadata document, the information after ‘Location’. IDP Entity ID: enter the id you’ve saved in step 2. You can also get this from the metadata document, the information after ‘EntityID’. IDP Certificate: enter the code you’ve saved in step 2. You can also get this from the metadata document, the code in between the ‘Certificate’ tag. Name identifier format: enter the identifier from the metadata document, the information after the tag ‘md:NameIDFormat’.
Step 5: Start testing
- Make sure you add yourself or some users to the user group entitled to use the Officebooking app (step 5).
- To test the SSO integration, open the mobile app or web app.
- you log in by selecting the button ‘Login with SSO’. You’ll need to enter the three letter Company code that you/is created for your company. You can find this in the OfficeAdmin on the Settings page (Settings > General > Tag prefix). The company code could for example be WIL for Wilderman.
- You’ll be redirected to your Google login page. Enter a valid user name and password. You’ll be validated by Google and successfully logged in at Officebooking via SSO.
Once logged in, Officebooking will automatically create the user account, which can be managed later in OfficeAdmin.
Do you need support?
Please let us know if you need any support during the process of setting up you SSO connection. We are happy you help!